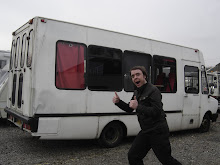
Tuesday, 24 February 2009


So here is the rear bunk fitted, its made from some old timber we had in the garage and two runners from the boys bunkbeds, they now sleep on the floor, just kidding we purchased them a new set as the wooden ones were getting on a bit!

The rear and side windows were painted with metal gloss paint, i just need to cut in the edges. This cost next to nothing and as the windows will be insulated and boarded over it matters not what they look like on the inside, from the outside it just looks like they have been tinted, easier and cheaper!!

Next job is to collect a load of ply i have purchased off Ebay and a few sheets from packing cases at work, we will then board out the sides under the bed, the back and the from of the upper bed, leaving a hole for the boys to climb though to access the bed, underneath with then be fitted with some caravan seats (if they fit) and the rear will be accessed from the back doors for storage of gas bottles and water......

No work this weekend as the kids are up and we dont want to tell them about it till its done, we will then suprise them by picking them up in it and going away for the weekend.

Wednesday, 18 February 2009

Dark evenings!

Curse these dark winter evenings...

Lucy is parked in storage away from the home so we can only work on here in daylight, i sit and wait for the weekends or the evenings to get lighter!

2 More sleeps till we can get our hands on her again.......

Sunday, 15 February 2009


Here is Lucy's heart!

Although i am not sure what engine this is, Ford or Pug! Anyone??

Saturday, 14 February 2009


So here is Lucy now with everything removed, note the timber across the back, this is a mock up of how the bed will sit. This will be all boarded in at the back with the back half for storage that we will access via the back doors, this will mainly be used for water tank, gas bottle and tools.

The front half of the underbed area will be seating, this will only be any good for the kids or us to lay in due to head space but with another dining area further down the bus we will have plenty of seating area for rainy days and cold evenings.

On the left hand side of Lucy where the wood is leaning we shall fit the kitchen units, these may come from a caravan my dad has given us or we shall fit some standard kitchen units that will be lowered and some of the depth removed.

On the right you see the old minibus seating that fixes to the rails in the floor, there is currently 2 sets of w seats facing each other, this will stay where it is for this year, we plan to fit a table that drops down to turn the seating area into a bed with the use of some foam, this will be for the eldest to use.

Next year we shall remove these seats and replace them with the type you find in a caravan so it looks a little neater, we also have to have lapbelts fitted as these are the only passanger seats when travelling...

Here is the view from the back doors looking up to the cab.

Here is the view from the cab looking at he back doors, this is before we stripped her out.

Friday, 6 February 2009

Wednesday, 4 February 2009

Where to start

Well here is my first blog!

Myself (Dave) and lovely girlfriend (Donna) have just been given an LDV minibus for the sole purpose of conversion into our first motorhome. The van is actually an ex council minibus and was owned by a nice chap who had part converted it, it contained 5 of the original minibus seats, a small kitchen unit, a bench and a cupboard unit.

With regards to the running of the bus it requires a new starter motor, exhaust and a good clean. Hopefully in the next few weeks we shall be putting it through the MOT and giving her a good clean inside and out ready for fitting.

Donna has named her Lucy so thats what i shall use going forward!

As for the layout we have decided that we shall build a double bed in the back section which will be raised above a storage area which we shall access from the back doors, also part of a seating area will be positioned under this bed which will also drop down into another double bed, we will build a kitchen area midway with sink, cooker and units/storage space, we will then leave in 4 of the original seats facing each other with a drop down table that can also be used as a bed. plenty of storage space at head height down both sides of Lucy will help store away all the bits and bobs. The seating area made from the original seats will more than likely be changed at a later date dependent on how we find it after using Lucy a few times.

Well we are still working out how to achieve all this so cant really say much more at the minute apart from keep checking for updates and watch this space.

Any tips/ideas or things to avoid would be very nice..

Dave